Skins
A board with a screen can dress up as a machine from another decade. A skin is a picture of a computer, a terminal or a front panel, and the board lights its lamps for real: the drive lamp flickers when the card is read, a power lamp blinks with network traffic, a row of panel lamps follows the lights effect, and the board's name, address and callers appear on the picture's own screen.
You draw the machine. The board makes it glow.
Skins are coming for ESP32-S3 boards with a screen: the roadmap says when. The first board for them is the Makerfabs ESP32-S3 Parallel TFT 3.5", with a 480 by 320 screen. This page describes skins as they have been built, and the stock skins are here to download, so you can start drawing now.
A skin is two files, a picture and a short text file, and nothing you put in them can break the board. If a skin is missing or has a mistake in it, the screen shows the board's built-in layout, called status, and the board tells you what was wrong and on which line.
You can send a skin to the board over the same connection you call it with, from your terminal program, without touching the card.
What you need
- A board with a display. The skins that come with the board are drawn for the Makerfabs ESP32-S3 with the 3.5 inch screen, which is 480 by 320 pixels. The Waveshare S3's small screen, 172 by 320, takes skins too, drawn for its size.
- An SD card in the board's card slot. Skins live on the card.
- A terminal program that can send a file by YMODEM, such as SyncTERM, to send skins to the board. Or a card reader, to copy them onto the card.
- A picture, from any paint program, photo editor or pixel art tool.
- A text editor: Notepad, TextEdit in plain text mode, nano, anything that saves plain text.
- For the helper tool, optional but worth it: Python 3.8 or later and the Pillow imaging library, on a Windows, Mac or Linux computer.
The stock skins
Five, drawn for the 480 by 320 screen. Each picture is the skin as the board draws it, lamps lit and status lines on its screen:
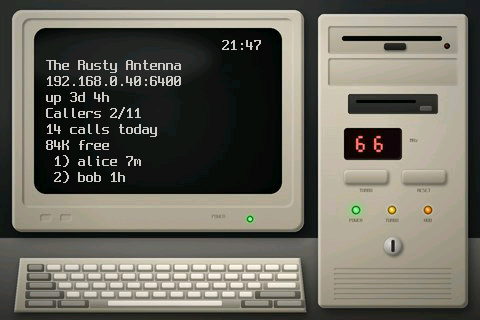
pc: a beige tower PC with its monitor. The hard disk lamp is the drive light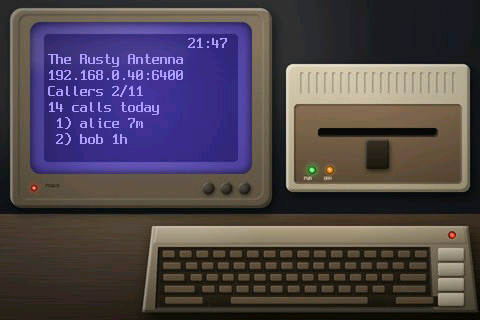
c64: a breadbin home computer with its disk drive and monitor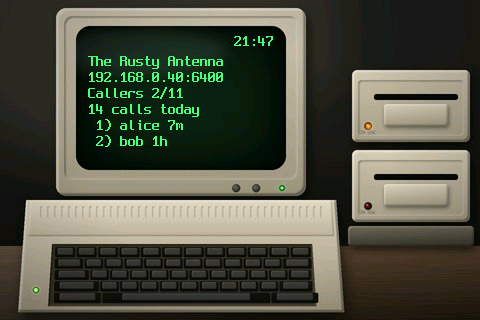
apple2: a beige computer with a lid, a green screen and two floppy drives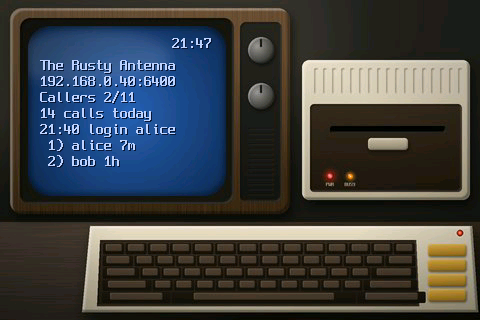
atari: a cream computer with its drive, and a wood-grain television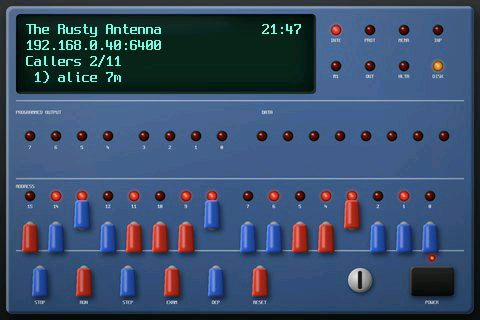
imsai: a front panel with paddle switches. Its 16 address lamps are the stripSkins are coming, on the roadmap. The stock ones are ready now, in two zips holding the same five:
- Download the stock skins for the card:
skins.zip, about 100 KB, laid out the way the card wants them. Unzip it at the top of the card, and you have askinsfolder with a folder inside for each skin. - Download them as pairs to send:
skins-upload.zip, about 100 KB, the same five as ten files,pc.txtandpc.jpgand so on, ready to send through the board's Skins file area.
A later release puts them on the card by itself.
No logos, and no trademark art. None of the stock skins carries a maker's badge, logo or name: they are drawings of a kind of machine, not of a product. A skin you make or share must not use them either.
The five-minute version
The quickest way to a skin of your own is to start from one that works.
- Unzip
skins.zipon your computer. You get askinsfolder with one folder inside for each skin. - Copy one of them, the
pcfolder say, and name the copy after your skin:my_tower. A skin's name is 1 to 24 letters, digits,_or-, and cannot bestatus. - Replace
background.jpgin the copy with your own picture, exactly 480 by 320 pixels, saved as an ordinary JPEG with the progressive option off. - Open
skin.txtin the copy and move the lights and the text to where they sit on your picture. The sections below say how. - Check it, look at it lit, and turn it into the pair of files the board takes:
python tools/mkskin.py check my_tower
python tools/mkskin.py preview my_tower -o my_tower.png
python tools/mkskin.py pair my_tower -o to_send
- Call the board, log in as the sysop and type
FILES 12, which opens the Skins area. PressUand sendto_send/my_tower.txtby YMODEM, thenUagain forto_send/my_tower.jpg. - Type
CONFIG panel, choosemy_toweron the Skin row and save.
Get the tool
mkskin.py checks a skin by the board's own rules, converts pictures, finds the lights for you, shows the skin lit, and makes the pair of files for sending, all before anything reaches the board. It is in the tools folder of the firmware's repository once skins are released: download the whole repository (the green Code button, then Download ZIP) and run the tool from inside it, because the preview borrows the screen's font from the repository's source.
Pillow installs with:
python -m pip install pillow
On Windows the command may be py rather than python. On a Debian or Ubuntu system that refuses pip, use sudo apt install -y python3-pil instead.
The check command needs no Pillow at all, only Python.
The picture
The picture is exactly the screen's size. 480 by 320 for the 3.5 inch screen. The board does not resize, and a picture of any other size is refused. If you have turned the screen with the USB plug setting, the size turns with it: stood on end, the Waveshare's screen is 172 wide and 320 tall, on its side 320 by 172.
The picture is a baseline JPEG. The ESP32-S3 draws it with a small JPEG decoder built into the chip, and that decoder is old and particular:
- Baseline, not progressive. If your editor's save dialog has a Progressive option, turn it off.
- Colour. A greyscale JPEG is refused, and so is CMYK, which is a printing setting.
- 8 bits a channel, which is what nearly every editor saves.
- Chroma subsampling of 4:4:4, 4:2:2 or 4:2:0. Every common setting is one of these.
If a picture will not pass, or you are not sure what your editor did, let the tool make the JPEG for you. It takes a PNG, a JPEG or most other formats:
python tools/mkskin.py jpeg my_art.png -o my_tower/background.jpg
A picture of another shape is cropped from its middle to fit, never stretched (add --stretch if you want it stretched). For the Waveshare, add --size 172x320.
Paint every lamp dark, the way it looks switched off. The board adds light on top of the picture and never takes any away, the way a real lamp behind coloured plastic does. A dark red lens glows red when the board lights it and looks like an unlit lamp when it does not. A lens painted bright already has nowhere to go.
Leave the machine's screen area in the picture looking like a screen, dark and plain: the board writes its status lines there.
The stock pictures are about 20 KB each. Size is not a worry.
skin.txt
A short text file that says where each light and the text go. This is the pc skin's, complete:
skin 1
panel 480 320
name Beige tower
; the hard disk lamp, a flicker for every read
drive 428 210 6 pc halo=5
; the turbo lamp, here for traffic
activity 392 210 6 colour=#FFC020 halo=5
; the monitor's tube, grey on black
text 46 58 224 128 colour=#C8C8C0 background=none
lines name address uptime callers today heap who
clock 222 38 colour=#C8C8C0
Positions are in pixels, counted from the top left corner of the picture: X across to the right, Y down. Any paint program shows you the X and Y of the spot under the mouse pointer.
| Line | What it does |
|---|---|
skin 1 | The format. Always the first line, always 1 |
panel 480 320 | The screen it is drawn for, width then height. Must match the picture |
name Beige tower | A title, up to 24 characters. PANEL shows it beside the skin's name. CONFIG lists skins by their names, not their titles |
drive X Y D STYLE | The drive light: its centre, the lens's diameter in pixels, and its style: pc, 1541, disk2 or breathe |
activity X Y D | The activity light, which blinks with network traffic. colour=#RRGGBB sets its colour: green if you leave it out |
strip N | How many strip lamps the skin has, 1 to 16. A led line for each follows |
led I X Y D | Strip lamp number I: its centre and diameter. Each lamp from 1 to N, once |
text X Y W H | The rectangle the status lines are written in: its top left corner, width and height |
lines ... | What the rectangle shows, top to bottom, from the words under the text and the clock |
clock X Y | The time, as HH:MM, with its top left corner at X Y |
Every line but skin and panel is optional, and each appears once. A skin with no lights and no text is a picture on the screen, and that is allowed.
The details:
- A lens is 2 to 64 pixels across.
halo=Non any light sets how far its glow spreads past the lens, 0 to 32 pixels. Leave it out and the glow is half the lens's diameter.- Options go after the fixed values, as
name=value, with no spaces around the=.colourcan also be speltcolor. - Colours are written
#RRGGBB, the six-digit hex colour every paint program shows:#FF3A20is a warm red. - Words can be in capitals or not. Spaces or tabs separate them.
- A line starting with
#is a comment, and so is anything after a;. - Plain text only, at most 120 characters a line and 4 KB for the file.
The text rectangle and the clock take these options:
| Option | What it does |
|---|---|
size=small or size=big | Small letters are 8 by 16 pixels, big ones 16 by 32. Small if you leave it out |
colour=#RRGGBB | The letters' colour. Light grey for text and yellow for the clock if you leave it out |
shadow=#RRGGBB | A shadow one pixel down and to the right, for text over a busy picture. none for no shadow, as it is if you leave it out |
background=#RRGGBB | A solid colour behind each line. none, as it is if you leave it out, writes the letters straight onto the picture |
align=left, centre or right | Where each line sits in the rectangle. Text only, not the clock |
Nothing may overlap. Each light takes a square box, its lens plus its halo on every side, and no two boxes, and no box and the text rectangle or the clock, may touch the same pixel. Everything has to fit on the screen too. The board redraws each thing by itself, many times a second, and this is what lets it do that without smudging its neighbour. Lamps close together want a smaller halo: a 6 pixel lens with halo=5 takes a 16 pixel box.
The lights
Three kinds, each drawn as light rather than paint: a lens that glows brighter at its centre, with a soft halo spreading onto the picture around it.
The drive light follows the board's real storage: amber when the SD card is read or written, cool white for the board's own memory, and a slow red blink after a storage error. Its style is how it behaves:
pc: a short flash on each access and a flicker through a long one, like an IBM PC's hard disk lamp.1541: lit for the whole access, like a 1541 floppy drive.disk2: lit for about a second after the last access, like the Apple II Disk II, whose motor kept running.breathe: a slow pulse at rest, with the access colour on top.
The activity light blinks with network traffic, in any colour you give it. A power lamp or a turbo lamp on the picture makes a good one.
The strip is up to 16 lamps that show whatever effect the lights plugin is running: nodes with a lamp for each caller line, hayes like a modem's front panel, blinken like a mainframe's, and the rest listed on the lights page. It works with no LED strip wired to the board at all.
The drive light and the strip come from the lights plugin, so it has to be switched on. On some boards it is on as shipped. If those lamps stay dark on your skin, type CONFIG lights and switch it on; it runs happily with nothing wired. Two of its settings reach the skin as well:
- Strip len is how many strip lamps the lights plugin drives, 10 as shipped. A skin with 16 lamps wants it set to 16, or lamps 11 to 16 stay dark.
- Brightness dims the lamps on the picture as it would dim a real LED. At 30% or more they are drawn at full brightness.
The activity light does not need the plugin.
Placing the lights with key colours
Finding the centre of a 6 pixel lens by hovering a mouse over it gets tedious by the third lamp. The tool can find them for you: paint a dot of a bright colour over each lamp on a copy of your picture, and it measures each dot and writes the lines.
Any colour works as a key, as long as it appears nowhere else in the picture. These are the ones the example below uses:
| Paint | Colour | How many |
|---|---|---|
| The drive light | magenta #FF00FF | One dot |
| The activity light | cyan #00FFFF | One dot |
| The strip lamps | yellow #FFFF00 | Up to 16 dots |
| The text rectangle | green #00FF00 | One filled rectangle |
- Make a copy of your background, at full size, and save it as a PNG. Work on the copy only, never on
background.jpg. - Paint a solid dot of its key colour over each lamp, the size of the lens, and a filled rectangle where the status lines go. Turn antialiasing off in your brush settings if you can.
- Run the tool on the copy, naming each colour, the drive style you want and where to write the result:
python tools/mkskin.py leds keyed.png --key drive=#FF00FF --key activity=#00FFFF --key led=#FFFF00 --key text=#00FF00 --style 1541 -o my_tower/skin.txt
- It writes a ready
skin.txt, something like this:
skin 1
panel 480 320
drive 306 166 13 1541
activity 445 230 11
strip 4
led 1 265 285 11
led 2 285 285 11
led 3 305 285 11
led 4 325 285 11
text 48 52 189 113
lines name address callers who
- Open it in a text editor and add what the tool cannot guess: a
name, the activity light's colour, the text's colour, and thelinesyou want.
Worth knowing:
-oreplaces whatever file it names, so point it at a new skin's folder, or leave it off and the lines appear on screen for you to copy.-owrites plain text the board reads. Sending the screen output to a file with>in Windows PowerShell writes a kind of text file the board refuses, so use-othere.- Strip lamps are numbered the way you would read a panel: the top row first, left to right, then the next row down.
- The diameter is the dot's width or height, whichever is larger. Paint the dot the size of the lens, not the size of the glow.
- A clock can be placed the same way with
--key clock=#RRGGBB: its dot marks the clock's top left corner. --halo Nsets the same halo on every light it writes.- If a colour is not found, the tool says so and leaves that light out. Saving as a JPEG blurs colours, which is why the copy is a PNG.
The text and the clock
The words on the lines line choose what the rectangle shows, one per row, top to bottom:
| Word | Shows | For example |
|---|---|---|
name | The board's name | The Rusty Antenna |
address | The address and port callers dial | 192.168.0.40:6400 |
uptime | How long since the board started | up 3d 4h |
callers | Callers on, out of the lines there are | Callers 2/11 |
today | Calls since midnight | 14 calls today |
heap | Free memory | 84K free |
card | Free space on the SD card | card 29 GB free |
clock | The time | 21:47 |
date | The date | Sat 26 Sep |
last | The most recent login, logoff or page | 21:40 login alice |
ring | Who is ringing for the sysop, empty when nobody is | alice is ringing |
blank | An empty row, for spacing | |
who | Who is on, one caller a row, in every row left | 1) alice 7m |
who fills the rest of the rectangle, so it goes last. Until the board has the time from the internet, clock shows --:-- and date shows nothing.
The rectangle has to be tall enough for its lines: 16 pixels a row for small letters, 32 for big. Six small lines need a rectangle at least 96 pixels tall. A line wider than the rectangle is cut short at its edge; small letters take 8 pixels each, so a 224 pixel wide rectangle holds 28 characters.
The separate clock line puts the time anywhere on the picture, on top of a TV cabinet or in a panel's readout. It is 40 by 16 pixels in small letters, 80 by 32 in big ones.
Check it and see it lit
Before it goes to the board, check the skin:
python tools/mkskin.py check my_tower
A good skin says my_tower: ok. A skin with a mistake says what and where, with the same words the board would use:
my_tower:
  skin.txt line 9: led 2's box overlaps led 1's (line 8)
Then look at it:
python tools/mkskin.py preview my_tower -o my_tower.png
Open my_tower.png. It is your picture with every lamp lit the way the board lights it and made-up status lines written in the screen's own font, so you can see whether the text sits in the monitor and the glow sits on the lamp. The drive light shows amber, as if the card were being read, and some of the strip lamps are lit and some are not. The pictures of the stock skins above were made the same way.
Sending it to the board
On a board with a display, the file areas have one called Skins. It is area 12 on the Makerfabs 3.5 inch board, and 14 on a board that also has a camera. Staff can look in it and download from it; only the sysop can send to it, and what the sysop sends is in at once, with no approval step.
A transfer carries one file, not a folder, so the Skins area takes a skin as a pair of files with the skin's name: my_tower.txt, which is its skin.txt, and my_tower.jpg, which is its picture. The tool makes the pair from a skin folder, checking it first:
python tools/mkskin.py pair my_tower -o to_send
That leaves my_tower.txt and my_tower.jpg in a folder called to_send. For the stock skins, skins-upload.zip above is already in pairs. Then:
- Call the board and log in as the sysop.
- Type
FILES 12, orFILES 14on a board with a camera. At the file area menu,#12and Enter does the same. - Press
U. The board says it is ready; start a YMODEM upload in your terminal program and choosemy_tower.txt. - Press
Uagain and sendmy_tower.jpgthe same way. - Type
CONFIG panel. On the Skin row (Panel skin on a wide terminal), press Space to step through the choices to your skin, and save.
The board loads the skin in the background, so callers are never held up. The status layout stays on the screen until the skin is ready.
Worth knowing:
- Sending a file that is already there replaces it. Send a new
my_tower.jpgand the board reads the skin again, even if it is on the screen at that moment. - The board refuses any other name as the transfer starts, before any of the file is kept, and says why:
Skins takes <name>.txt and <name>.jpg, name 1-24 of A-Z 0-9 _ -.The name follows the same rule as a skin's folder. Eerases a file there, by its number in the list. With either half gone, CONFIG stops offering that skin.- A folder beats a pair. If the card has a folder
skins/my_tower/as well as the pair, the board reads the folder. Give a skin you send a name of its own.
Or copy it onto the card
If you would rather use a card reader, a skin can go on the card as a folder, the same layout as skins.zip:
skins/
  my_tower/
    background.jpg
skin.txt- Log in as the sysop and type
SD UNMOUNT, so the card can come out safely. - Take the card out and copy your skin's folder into the card's
skinsfolder. Make theskinsfolder at the top of the card if it is not there. - Put the card back and type
SD MOUNT. The board may pause for a moment while it reads the card. - Choose it in
CONFIG panelas above.
Changing a skin that is already on the screen this way. The board keeps a loaded skin in memory and does not reread the card for it by itself. After copying a new version onto the card, choose status, save, choose your skin again and save. Restarting the board works too. Sending the new version through the Skins area instead does all of that for you.
Choosing a skin
The Skin row in CONFIG panel lists status and up to 16 skins from the card, in name order. It lists only skins that have both their files, whose skin.txt reads cleanly, and that are drawn for this screen's size. If yours is missing from the list, run check on it.
When it does not show
Type PANEL. Among what it prints, a line says which skin is on the screen, with its title from the name line: Skin my_tower (My tower). When it is not the one you chose, that line says Skin status and a red line under it says why:
Skin status
Not my_tower: skin.txt line 9: led 2's box overlaps led 1's (line 8)
The same reason goes to the board's console. The ones you are likely to meet:
| PANEL says | What to do |
|---|---|
Not my_tower: background.jpg is 640x480; the panel is 480x320 | Make the picture exactly the screen's size. mkskin.py jpeg does it |
Not my_tower: background.jpg: progressive JPEG: save it as baseline (not progressive) | Save it again with the progressive option off, or use mkskin.py jpeg |
Not my_tower: background.jpg: greyscale: save it in colour (YCbCr) | Save it as a colour JPEG, even if the picture is black and white |
Not my_tower: background.jpg: fill bytes between segments: save it again as baseline | Rare. Save it again, or use mkskin.py jpeg |
Not my_tower: background.jpg: an empty segment the decoder refuses: save it again | Rare. Save it again, or use mkskin.py jpeg |
Not my_tower: skin.txt line 9: led 2's box overlaps led 1's (line 8) | Move the lamps apart or give them a smaller halo |
Not my_tower: skin.txt line 4: 'drvie' is not a skin directive | A typo on that line |
Not my_tower: skin.txt line 7: 3 lines of 16 px need 48 px; the rectangle is 40 | Make the text rectangle taller, or show fewer lines |
Not my_tower: skin.txt line 1: a character that is not plain ASCII (byte 239) | The editor saved the file as "UTF-8 with BOM". Save it as plain text, ASCII or UTF-8 without BOM |
Not my_tower: drawn for a 480x320 panel; this one is 172x320 | The skin is for another screen, or the screen has been turned |
Not my_tower: no skins/my_tower/ or skins/my_tower.txt on the card | Neither the folder nor the pair is there, or the name differs by a letter |
Not my_tower: no background.jpg (or my_tower.jpg) beside its skin.txt | The picture is missing: send my_tower.jpg, or copy background.jpg into the folder |
Not my_tower: no SD card | The card is not in, or not mounted: SD MOUNT |
Not my_tower: loading | Nothing is wrong. Give it a second |
The line numbers count every line of skin.txt, blank lines and comments included, starting from 1, the way a text editor numbers them.
After fixing a skin that failed, the board tries it again when you send a new file for it through the Skins area, when you save any page of CONFIG, after SD UNMOUNT and SD MOUNT, or after a restart. It does not keep retrying on its own, so that a broken skin is not reread over and over.
Sharing a skin
When a skin looks right, the tool packs it for somebody else:
python tools/mkskin.py pack my_tower -o my_tower.zip
It checks the skin first and refuses to pack one with a mistake in it. The zip holds skins/my_tower/ with both files, so whoever receives it unzips it onto the top of their card as it is, or runs pair on the folder and sends it through their Skins area. Several skins go in one zip: python tools/mkskin.py pack my_tower my_terminal -o my_skins.zip. A README.txt in a skin's folder goes into the zip too, which is a good place to say who drew it.
Two things before you share:
- Use art you made or have the rights to. A photo from a web search belongs to whoever took it.
- Leave makers' logos and names off the machine. A drawing of a beige tower is yours to give away. A company's badge on it is not.
When the board puts the stock skins on the card
A later release puts the five stock skins on the card by itself and keeps them current when new versions ship. It never overwrites one you have changed: once you change any file in a stock skin's folder, the board treats the whole folder as yours and leaves it alone. A stock folder you delete comes back, so make your own skins under names of their own rather than editing pc or imsai in place.